Blog
3D Printing Project
3D Printed Vessels (Clay)

This semester, for student teacher, I was lucky enough to be paired with a ceramics teacher from a local high school who is very innovative with technology. He had assigned a project that allowed his students to use a digital 3D design software called Potterware, which is specifically for building 3D vessels for a clay 3D printer. While his students were assigned to create a mug, he kindly allowed me to print my own vessel to use for this 3D printing project. Without access to the 3DPotterBot, I would have otherwise completed this project with a traditional plastic filament 3D printer.

It was so fun to watch this vessel take physical form, but unfortunately the first attempt was not successful and had to be squished back into the clay pile to be recycled. The nature of the design was not sturdy enough to hold itself with the weight of the clay, due to its deep twists and folds, causing the vessel to collapse during printing.
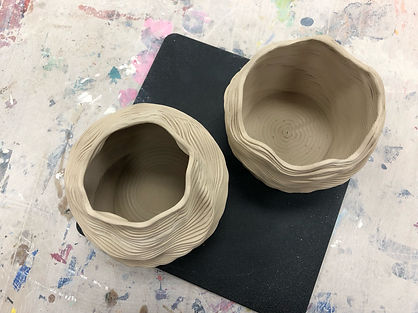
The Final (Successful ) Prints


Creating a successful piece took several variations of the design, in which I adjusted printing settings, shortened the amplitude of the waves, and minimized the depth of the twists. The piece on the right had to be stopped before it could be fully printed to adjust the amplitude setting. The waves were starting to become unstable, the malleability of the clay being a fragile factor when 3D printing. The larger piece on the left was the first vessel I was able to print to completion.
After allowing the piece to dry slightly, I used a wire tool to cut them off of the fiber board and placed them on a plastic board. After drying a while longer, I smoothed out the seam of the final extrusion and any air bubbles, gaps in the clay, or other slight imperfections. It is ideal to attempt this after the clay has achieved a nearly leather-hard level of dryness, but with my limited access to the printer I had to do this while it was softer and more difficult to work with.

These are the final results after manual touchups.

After glazing the vessels with "Avocado" and "Honey Amber" this is the final result!


Wearable Arts (Functional/Dysfunctional)
"Cloud Money-Holder
(Cloudy with a Chance of Money)"


For this project, I decided to create a vessel for holding objects, in this case money (a penny that has been sitting on our front porch for several weeks, a sort of memento for the house we are currently moving out of) and can be worn as a pendant. The final form I came up with was a cute little cloud shape.
Function / Dysfunction:
The functional aspect of this piece is its ability to transport objects/money.
The dysfunction lies in the fact that the object is enclosed in plastic and cannot be removed without breaking it open. It also contains a penny, which is no longer an efficient currency within the U.S. mint, due to the cost of production being higher than its worth, and its lack of widespread use among consumers.
Its largest dysfunction is the fact that the loop of the pendant kept falling off and must now be worn in my pocket, defeating its purpose entirely.
But I will continue to cherish it for its sentimental value.


A couple years ago, I found a brand new 3D pen at Goodwill, and I had never tested it out until now. 3D pens are comparable to a freehand 3D printer and work similarly to a hot glue gun. The box comes with 2 different types of filament, ABS and PLA, which have different printing qualities.

It also comes with tools for maintenance.


I first tested out the ABS filament because I liked the bright colors it came with. The quality of the ABS (yellow) was a little to flexible for what I wanted, so I went with the blue PLA filament.
Considerations for future use:
I had a lot of fun using the 3D pen! I waited a long time to try using it because it seemed complicated, but it was pretty easy to get started. I'm not sure what I would use this for in the future other than crafting jewelry or other small sculptures, but I am certainly excited to use it again.
Considerations for classroom use:
While 3D pens are not outrageously expensive, especially in comparison to a 3D printer, they seem to need more maintenance (clogging, etc.) than a 3D printer. They also have the added hazard of the ability to get burned. I don't think they have the ability to burn skin as much as a glue gun, since the plastic does not adhere to skin and cools more quickly than hot glue, but the tip can be pretty hot to the touch. Overall, I think this would make a great addition to an art class of middle or high school students, but I think it would work best with a small group of students in order to avoid excessive mishaps.
Cute and Creepy Project
"Poppin' Stress"


This little guy was inspired by "cute and creepy" characters from my childhood, such as the (Poppin' Fresh) Pillsbury Dough Boy, Casper the Friendly Ghost, and the Worm (William) from Jim Henson's Labyrinth (1986).
Pillsbury Dough Boy
While the Pillsbury dough boy is mostly seen as cute from today's media, old commercials add to the creepy factor in his features, such as the round, beady eyes and the slight smile with a barely visible nose.


Pillsbury advertisement (1965)


Abraham, Nehita. “Pillsbury Doughboy: Changes over the Years.” Daily Hawker, 6 Mar. 2020, https://www.dailyhawker.com/entertainment/pillsbury-doughboy/.
Pillsbury Poppin' Fresh Commercial (1960s) - (1:01)
Casper the Friendly Ghost
Casper the Friendly Ghost is cute in theory, but, again, the evolution of his character design has shifted between creepier and cuter throughout the years. The early hand-drawn cartoons and some of the 90s CGI renditions are especially creepy. Similarly, Casper also has large eyes, though his are more ovular, and a slight open smile, but his expression is slightly more surprised looking with his high arched brows.

The version of Casper I was most familiar with throughout my childhood was from the movie Casper Meets Wendy (1998).


Casper the Friendly Ghost (1945) - (9:20)
Worm (William) from Labyrinth (1986)
I have always thought the worm from Labyrinth was super cute, with his friendly cockney accent and his tiny little scarf, but I can understand why other people I've talked to thought he was creepy-looking. He has big red eyes with hooded eyelids, fleshy skin with folds in his face and body, nostrils without a pronounced nose, and a small mouth. I'm unsure if his caterpillar-like hair would be seen as conventionally cute or creepy, but I still find him adorable.

Labyrinth worm scene - (1:57)
Process Documentation:
Sculpting with Air-dry Clay

Working with air-dry clay was not too difficult to get used to, but it was much smoother and softer than natural clay, which made it less stable to work with. I tried to use the score and slip (water) technique, but it was more efficient to try to push the parts together and smooth it down with my fingers.


In the same ways that the Pillsbury dough boy and Casper have large, round eyes and small smiles that make them creepy and soft round bodies that make them cute, "Poppin' Stress" has similar features. I added large, human-like hands (sort of similar to Casper), though his are small) coming towards the viewer to add to its creepiness. I also turned it into a worm-like form with ridges and folds on the bottom and an indented back to make it more caterpillar-like.
Drying

Painting with Acrylic

Pink skin to add the cuteness factor.


White eyes for crispness, and no added pupils for "soullessness"

Considerations for upcoming work in this medium:
This medium was fun, but not as easy to work with as clay due to the drying speed and malleability. I likely will not use this in the future due to its brittleness when dry. When attempting to add more painted details to my sculpture, the fingers broke off on one hand, and the other hand broke during transit.
Considerations for teaching with this medium:
This medium would work well when teaching in a context without access to a kiln, but I do think parts being easily broken off when dry would cause problems. It might be worth it if I was able to find a different version of modeling clay that was stronger when dry.
Considerations for upcoming work / teaching with this medium:
I am a huge fan of working with clay and I absolutely loved this project. When I become a teacher, a 3DPotterBot will be at the top of my list if my school has the budget for one. There are a lot of factors that can go wrong throughout this process, so it requires a thorough understanding of the Potterware program, as well as troubleshooting the machine, but I am more than willing to learn with practice. As for my own art practice, I am becoming more and more interested in exploring clay as a primary medium, and throughout this process I had multiple people ask if they could buy a 3D printed piece. It seems like a wonderful investment to look into.
Visual Cultures Project
"Spectrum"
This short film is a collaborative project between me and my partner, Ash. Using a portable handheld digital microscope, I documented things that interested me, and using my description of the mood I envisioned, Ash created a musical composition to go with it. Filming with a microscope forced me to pay close attention to everything around me, and allowed me to see them as new and bizarre. Finding meaning within the things we see, or look past every day was the focus of this visual cultures project. After documenting my various observations, I looked for visual elements that would connect them together, and arranged them to follow the rhythm of the music. The connections that I found were based on two factors:
Color and Pairs.
The clips were arranged by color, following the documentation of a neighbor's ball that landed in our yard. The label on the ball said "Spectrum," hence the title. The other outcome of my findings was my attraction to objects in pairs. Spring is mating and breeding season for many animals, and several of the insects I observed were gathered in pairs. Even some objects I captured were found in pairs. I think the editing of this video was subconsciously arranged as a metaphor of my relationship with Ash. The psychosexual themes are clear in some scenes, but carry over when juxtaposed with imagery such as the crushed worm.
The concept of stability and queer partnership is something I am exploring, as it is a new feeling for me. It is strange, and sometimes sad, but it is beautiful in its complexity. Collaborating on this project with my partner, and about my relationship, was very special to both of us, and I am pleased with the result.
Process Details:
Considerations for upcoming work in this medium:
Though the lo-fi quality of the Celestron Flipview microscope is appealing to me, optimum lighting is ideal for recording and I will take that into consideration for future works. I also intend to utilize the zoom-in feature more intentionally, as comparisons between microscopic textures is a detail I would like to explore further.
Considerations for teaching with this medium:
This summer I will be teaching a class (Mason Community Arts Academy) for ages 6-8. While it will not be feasible to give every student their own microscope, I will be connecting the microscope to the television screen throughout the course as a way to introduce materials, such as clay and found objects, allowing students to learn about materials from the core of their particulate structures.

Notes from the instructions I gave Ash
for producing the music:
Behind the scenes footage:
"Yeah, it's not a very good microscope."
